CLICK HERE FOR BLOGGER TEMPLATES AND MYSPACE LAYOUTS »

Saturday, December 31, 2011

Let's get this party ROCKING!


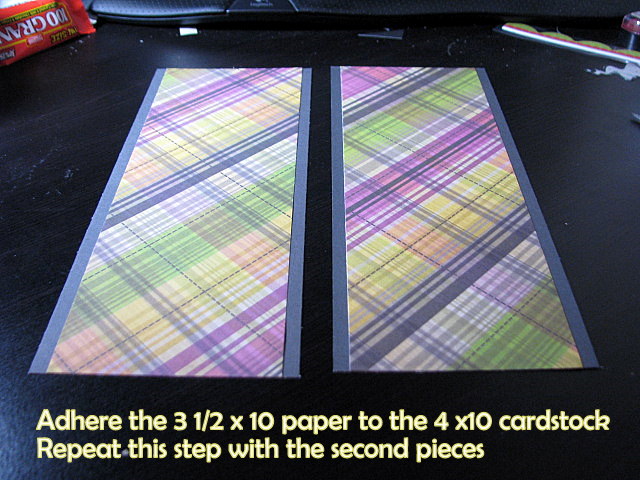
Well 2011 has been quite the year! I entered into new adventures, had good times, had great times and yes, even had some bad times, but all in all 2011 was pretty good to me. As we see it come to an end, I am saying goodbye to somethings and welcoming a whole new set of wonderful things to come. Stick around and you can follow these adventures with me...starting with an awesome "pre" CHA party with me and the girls over at Ruby Rock-It. We have so much fun up our sleeves for all of you...challenges, sneak peeks, and what kind of party would it be without PRIZES!!! Make sure you stop by their blog along with all the Ruby Rock-It girl's blogs to see what they all have in store for you! I will give you a day by day itinerary so stay tuned.....

Monday, December 26, 2011

Christmas Traditions and a Sneak Peek with Ruby Rock-It!

Whew! I made it through the last couple of days. Can you believe all that prepping and shopping and baking...and now it is over? This year was so crazy for me, somehow the days just totally got passed me. As much as I hate to say it, I am almost glad it is over. I made so many cookies and wrapped so many presents I am glad there is 364 more days until the next one. I did manage to get a few layouts done though. I wanted to show you my Christmas traditions that I shared with you earlier this month scrapped...not only did I showcase the photos in layouts, I was able to show how you can use these wonderful Ruby Rock-It girl and boy papers in a very non traditional way. The first layout I did for you is my daughter with her new Christmas pajamas. I used the Paper Doll line for her and for my son I was able to use the Paper Boy line. I really hope you enjoyed these projects as much as I enjoyed making them for you...remember....you don't always have to stay in the box with your lines, and I hope I was able to show you that.


Also over on the Ruby Rock-It blog they announced the winner of the Christmas Traditions Giveaway AND revealed yet another AWESOME sneak peek of the goodies you will soon be seeing at CHA so head on over there and check it out!

Tuesday, December 20, 2011

Ruby Rock-It CHA Previews.....


Ruby Rock-It is ready to roll out a few sneak peeks for upcoming Winter CHA Anaheim in January. We are very excited to fully review these ranges to you a little at a time starting in January as we work to make our way to Anaheim for the big release. We will be in both #3177 so please make sure to stop by to see all the vintage inspired goodness in person. Above is simply a peek of what's to come.

Also, stay tuned for all that the Ruby Rock-It design team has up their creative sleeves to show you how they will be using the new goodies in their designs. As such, if you are not attending CHA in Anaheim don't worry, make sure to stop by the blog here weekly in January as we will be having parties, doing giveways and sharing inspiration.

We hope you will join us on our adventure.

Thursday, December 8, 2011

Gift Box Tutorial

Hi everyone happy Thursday! I hope everyone is having a wonderful holiday season so far. I just celebrated my birthday and now I am getting into the holiday spirit! A while ago I had made these cute little origami gift boxes and I got an over whelming response on how to make them. I thought this would be the perfect time to share that little secret. I am always looking for new ways to package gifts and these little boxes are perfect...they take maybe 10 minutes to make and are perfect for gift cards or any special little gift.


First you are going to start with 2 12x12 sheets of patterned paper. They can be single sided since we are going to fold them. Choose which sheet you want for your bottom and cut that down to 11.5 x 11.5 inches.

Next you are going to fold that in half one way and then fold it in half the other way. You can use a bone folder to sharpen the creases. Open it back up and fold each corner in.

Once you have all 4 corners folded you are going to fold one side to the center and then fold the other side to meet your first fold. Repeat the other way.

Open your last 4 folds to look like this:

Now you are going to pull the top and bottom triangles out and fold the edges upright.

Now, holding the sides in place, pull the top triangle up and tuck inside...you may want to secure it with some double sided tape. Repeat on the other side.

This is what your bottom should look like:

For the top of the box you are going to do the same exact thing. This one will be a little bit bigger than the bottom part. Now you can decorate your box any way you like. I chose to make a bow to match my box. To do this you need to cut 7 1.5 x 12 inch strips. Fold 6 of the strips in half securing with a staple. Once you have all of your strips cut and secured layer them to form your bow. With your last strip fold it to form a circle big enough to fill the center of your bow. You can make smaller bows if you like, just cut the length of your strips smaller. Attach your bow to the top of your box and you are ready to fill it up and send it to that special someone!
Products used: All Through The Year 12 x 12 Super Pad-PA-1991 by Momenta

Thursday, December 1, 2011

Ruby Rock-It giveaway!


Happy December everyone! I hope everyone is in the Christmas spirit because Ruby Rock-It sure is. Stop by their blog and see what they are up to. There is a giveaway going on...just in time for the holidays!

Wednesday, November 23, 2011

Cards, cards, and more cards!

Well, Happy day before Thanksgiving! I remember in my younger years this being the busiest bar night of the year. Waiting in line outside for hours just to get inside to be stuffed into a room where you could not even move...well now that I am older, I find myself still standing in lines to get in some place that is so over crowded, only this time it is the grocery store! My how times have changed. This year I am cooking Thanksgiving dinner for the first time...yay...can't wait....not really. I am going to be so busy prepping and cooking and pulling my hair out...okay maybe not that but who knows. I know these cards have no relevance to Thanksgiving but I wanted to get them out there before they got lost in the holiday shuffle. I hope you enjoy and I hope everyone has a wonderful and blessed Thanksgiving...I will be back after my Black Friday shopping!
This first set of cards are all made from one kit...Momenta has these really cool card kits. Everything you need in spot...plus get this, the box they come in is a decorative box with a magnetic enclosure. How cool is that. When you finish making all the cards you can embellish the box and you have an instant gift for someone. Each kit comes with 4 designs with 3 of each design for a total of 12 cards. I only did one of each of the different designs I am still trying to decide if I want them all the same or if I want 12 entirely different cards...so see, the possibilities are endless with these kits.


This second set is the cards to go with the accordion purse I made recently using the We R Memory Keepers "Retro Galm" line....


Again, wishing you all a very Happy Thanksgiving...see ya soon!

Tuesday, November 22, 2011

Momenta and Epiphany Crafts!

Hi everyone! In case you missed it, this week Momenta and Epiphany Crafts have teamed up to bring you some wonderful projects.
I made a few different projects for you today just to show how adaptable the Epiphany Craft Shape Studio Tool can be. It was so easy and fun to be able to create my own customizable embellishments to go along with my Momenta products.
For my first project I created a layout. I used letter stickers from Momenta and added them to some Momenta patterned paper slid them into the Epiphany Crafts tool and instant bubble letters!

For my second and third projects I made you a beautiful card and altered frame using the Epiphany Crafts tool to make beautiful flower centers.


I really enjoyed this cool tool and can't wait to go out and get me some more! Thank you Momenta and Epiphany Crafts!
So how would you like to win some of Momenta's amazing products?

They've generously offered a prize package worth over $40 (picture papers, stickers and more!!) and Epiphany Crafts is going to tuck in the Round Shape Circle 25, Bubble Caps and a pack of Vintage Setting to get you started off with a bang!
Head on over to Epiphany Crafts and leave a comment and then head on over to http://mymomentablog.blogspot.com/ for more details and more chances to win.


Products used:
EC Shape Studio-Scalloped Circle
EC Bubble Caps-Scalloped Circle
EC Star Felt Flowers
Momenta ST-3953 Sticker Kit
Momenta ST-4833 Sticker Kit
Momenta ST-3951 Sticker Kit
Momenta ST 4909 Puffy Messages
Momenta ST-4765 Puffy Flourish Stickers
Momenta NC-1360 Kaleidoscope Card Kit
Momenta PA-2263 Free to be Me 12x12 Super Pad
Momenta PA-1991 All through the Years 12x12 Super Pad

Tuesday, November 15, 2011

An Accordian purse card holder with tutorial

If you are like me, there comes times when I am in a bind for a quick gift. This handy little project will be just the thing you need. It is quick and easy to make. Once you get the hang of it, you can be whipping these out in about an hour. I actually have 3 of them I have made already for teacher's gifts for the holidays.


So, if you are ready let's get started!

First, you are going to need the following supplies:

CARDSTOCK: One 6"x11" - One 6"x7" - Two 4"x10" - Four 4"x5 3/4" - One 1 1/2' x 11"

PATTERNED PAPER: Two 3 1/2" x 10" - One 5 1/2" x 9 1/2" - One 3 1/2" x 51/2" - One 1" x 11"

ROUND CORNER PUNCH

GLUE or DOUBLE STICK TAPE

VELCRO

SCORER

ADDITIONAL EMBELLISHMENTS

Alright, here is your first step...


Now, attatch the strip you just made to the non adhered part of the 5 1/2 x 9 1/2 paper to make the handle and then finish adhering the rest of the paper down:


Apply glue or tape to the left and right outer panels of the folded 4 x 10”card stock...

Adhere one side of the 4 x 10 cardstock to back 4" panel of the main piece and do the same for the front of the main piece. Repeat for the second 4" panel.


You can then decorate the fron any way you like. I will post the coordinating cards tomorrow.

Friday, November 11, 2011

Her Halloween Transformation...

Okay...this is really a first for me. I actually got a Halloween layout done within a week after Halloween! Yay me! When I did this layout I wanted to keep it pretty simple focusing on the photos. I used the back side of the Momenta 12x12 Snake print cardstock for my background and went from there. I used an orange print and a black print from the Momenta Kaleidoscope 12x12 Super Pad to add that "punch" of color to bring out the last picture. I added an awesome flourished boarder and Momenta Pure Puffy Black Polka Dot Alphas to make my title. Quick and fun page...in about 30 minutes.


Products used:
ST-2561 Pure Puffy Alphas
PA-2350 12x12 Snake Animal Print Open Stock Cardstock
PA-2329 12x12 Super Pad (Kaliedoscope)
PA-0659 12x12 Textured Cardstock (Earth tones)

Tuesday, November 1, 2011

A couple of Halloween photos!

Ah, Halloween! My favorite time of the year. Well most of the Halloween season is with the exception of going to pick out my daughters costume. Usually we for some reason end up waiting until the last minute to go and get her one...maybe because she can never decide on what she wants to be...you know, changing her mind every other day. Well this year was no different except that when we got to the Halloween store we didn't have to set up camp in there. She found a costume within the first 5 minutes and she was super excited about it. We got the costume and also purchased all the "extras" and home we went. She chose some sort of owl costume so she immediately went online and searched for owl face painting. Of course she had to choose one that was not that easy and if you know my daughter you know that once she gets an idea in her head...she stands strong and it must look EXACTLY the way she sees it in her head. We know how she gets so we had to threaten her with Trick-Or-Treating (or at least she thought we were)so were a bit nervous...ya know...no pressure! Well the morning of Halloween the face make-up and wig were broke out...to our surprise...she liked it better than the tutorial!


Monday, October 31, 2011

Exciting news.....

A little while back I stumbled upon this neat scrapbooking company. Based out of Australia, they were bringing their wonderful products to the US. I started following them...got some of the products (which are very high quality and fun to work with) and then tried out for the first US Design team. Well I am happy to say that I made the team!!! Yay! I am so excited to get to work with these wonderful products and with the talented ladies on the team.