
Monday, October 31, 2011
Exciting news.....
A little while back I stumbled upon this neat scrapbooking company. Based out of Australia, they were bringing their wonderful products to the US. I started following them...got some of the products (which are very high quality and fun to work with) and then tried out for the first US Design team. Well I am happy to say that I made the team!!! Yay! I am so excited to get to work with these wonderful products and with the talented ladies on the team.


Saturday, October 29, 2011
Birthday fun with Candy Tubes!
Recently I got to play with a new product that A Cherry on Top is carrying. Boy were these fun! The possibilities are endless. I decided to make a fun little birthday gift. I made the tube holders with my Scor-Buddy and some bigger scraps of cardstock. They were really quite easy and fun to make. Once I got the box done I decorated it and filled the tubes up with some candy and my little gift was ready to go!

Products used:
Ruby Rocket Designs-Bella-Paper Doll Collection(Tube holder base)
Creative Imaginations Birthday Bliss (Embellishments)
Candy Tubes-8 inch clear craft tubes
Scor-Buddy

Products used:
Ruby Rocket Designs-Bella-Paper Doll Collection(Tube holder base)
Creative Imaginations Birthday Bliss (Embellishments)
Candy Tubes-8 inch clear craft tubes
Scor-Buddy
Friday, October 28, 2011
Altered Composition Book...
Hi everyone, today I am going to show you a fun altered composition book I made for my daughter. My daughter loves to draw, write stories and poems. She will write them on anything she can get her hands on. I noticed this weekend as I was cleaning, her poems and drawings were everywhere! By the time I was done cleaning I had a pile of mismatched paper with all of her wonderful work. I thought it would be nice for her to have a cute little book where she can compile them all in one place. She would also need a pen to go with this neat little book. I came up with an idea to cut a pocket off of one of her pairs of old jeans. I decorated the front cover and glued the pocket on when I was finished and tada.....she now had a place to keep her pens and pencils and would always have one when she got the creative bug!

Products used: MOMENTA
PK-1892 12x12 Simply Perfect Boxed Scrapbook Kit/Raspberry Pop
ST-3838 Clear Layered Stickers/Emily's Garden
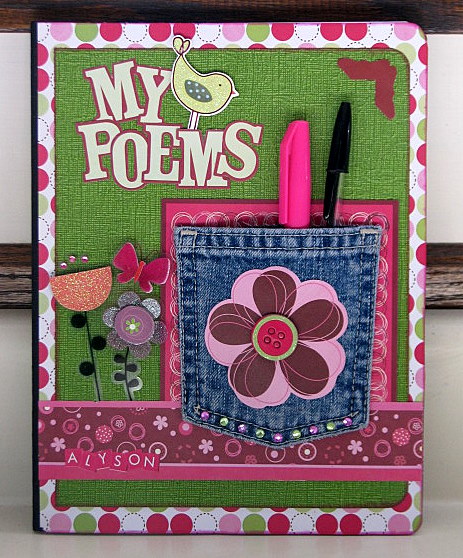
Products used: MOMENTA
PK-1892 12x12 Simply Perfect Boxed Scrapbook Kit/Raspberry Pop
ST-3838 Clear Layered Stickers/Emily's Garden
Monday, October 17, 2011
Countdown to Santa Clipboard
Yeah, I know we just began the fall season, but it isn't that often that I am ahead of schedule. A Cherry on Top just had their fall online crop and I figured it was the perfect opportunity to do something to get me on the track to Christmas. I have always wanted to alter a clipboard so I decided to do a class on it for the crop. This Bo Bunny Father Christmas line was just so elegant and so full of rich non traditional Christmas colors I knew it would be perfect to make a countdown to Santa altered clipboard. I love how it turned out although I think my kids might miss getting that candy every morning!


Wednesday, October 12, 2011
Tri-Shutter Mini Album Turorial....
I love making mini albums. They are perfect for when you have a lot of pictures from one event but they are also perfect for when you don't have enough pictures to make a layout and they make the perfect gift! The mini album I am going to show you today can serve two purposes...it can be a mini album and it can also be a mini album card. I actually made this album by attatching two tri-fold cards together and adding a cover. Once you see how easy and fun these are you will be making them all the time. So let's get started....
First, you are going to start with a 12"x12" sheet of cardstock and you are going to cut into 2 - 6"x12" pieces:

You are then going to take each 6"x12" piece and score them on the 12" side at 2-4-8-10 inch marks

Cut 1 and a half inches in on the long side from the 2 inch mark to the 10 inch mark

The folding is the trickiest part, but once you get it figured out this is what you will end up with

You are now going to take more pieces of cardstock and cut 2 - 4"x6" pieces and 2 - 6"x6" pieces

Taking the 2 tri-fold pieces, match up together and attatch the 4"x6" cardstock to the front and back

Now take the 2 6"x6" pieces of cardstock and score them both at the 2 inch mark

Add these 2 pieces to the right and left sides. These will be your cover.

As you can see, I wanted to add a few more pictures so I took the first photo and added a folded strip so I could make a little flip up of photos. I did this on both sides where you first open the album...To acheive this look...use a 1 inch strip and attatch halfway on the back of your photos and then attatch cardstock over the back of each photo

You are now ready to decorate your album...be creative, and most importantly...have fun! This album was a little hard to photograph, but here is my finished product...


These photos are from the begining of the album to the end:


First, you are going to start with a 12"x12" sheet of cardstock and you are going to cut into 2 - 6"x12" pieces:

You are then going to take each 6"x12" piece and score them on the 12" side at 2-4-8-10 inch marks

Cut 1 and a half inches in on the long side from the 2 inch mark to the 10 inch mark

The folding is the trickiest part, but once you get it figured out this is what you will end up with

You are now going to take more pieces of cardstock and cut 2 - 4"x6" pieces and 2 - 6"x6" pieces

Taking the 2 tri-fold pieces, match up together and attatch the 4"x6" cardstock to the front and back

Now take the 2 6"x6" pieces of cardstock and score them both at the 2 inch mark

Add these 2 pieces to the right and left sides. These will be your cover.

As you can see, I wanted to add a few more pictures so I took the first photo and added a folded strip so I could make a little flip up of photos. I did this on both sides where you first open the album...To acheive this look...use a 1 inch strip and attatch halfway on the back of your photos and then attatch cardstock over the back of each photo

You are now ready to decorate your album...be creative, and most importantly...have fun! This album was a little hard to photograph, but here is my finished product...


These photos are from the begining of the album to the end:


Tuesday, October 11, 2011
Flashback Friday...16.0
A friend of mine posted this really cool challenge she spotted. It is over at Flashback Friday Challenges. Paper Issues is sponsoring this challenge with an awesome prize...awesome enough to risk the embarrassment of posting this project! The challenge is to post the first tag you ever made. I think this is about the only tag I ever really made, the date on the post is from June of 2008...how's that for a Flachback!


Wednesday, October 5, 2011
A little sneak peek...
October 14-16 A Cherry on Top is having another one of their wonderfully fun online crops! I hope to see all of you there. Lot's of fun, games, challenges, inspiration and classes will be going on. I am teaching a Countdown to Santa altered clipboard. Here is a little sneak peek....you will have to come to the crop if you want to see the rest! In case you are interested in taking this class you will need a clipboard, an empty cracker box(or whatever you have on hand, I used a Club Cracker box), 2 of those 12x12 chipboard backings we all hoard when we get our online orders, misc. cardstock, ribbon and I used the Bo Bunny Father Christmas line.


Subscribe to:
Posts (Atom)


