CLICK HERE FOR BLOGGER TEMPLATES AND MYSPACE LAYOUTS »

Wednesday, March 27, 2013

A little Spring reminder...

I don't know what the weather is like by all of you, but the last time I checked it was supposed to be Spring here by me but I think Mother Nature misplaced the memo. Here we are the last couple of days into March and it has been snowing, freezing rain and lots of wind here in Chicago. I myself really wish those beuatiful spring days would hurry up and get here. Besides taking pictures of my children, flowers are my next favorite photo subjects. Since I have so many beautiful flowers to photograph in my yard, I have a ton of photos in my library so since Spring wasn't coming to me I would do a layout to remind myself and all of you what will be coming if Mother Nature would just quit being so stubborn...
For this layout I used several different product lines, again showing how versatile  the RRBF lines are. The background paper is from the Bella! J'adore line. I used the 12x12 diecut from the Cook line. I didn't want to cover up the detail in the corner of my background paper so I cut out the outline with a craft knife so I could insert the corner of my diecut through allowing the beautiful detail to overlap. I also inked the edges of the diecut to make it stand out against the background a little better. I used some more background paper from the J'adore line, some Bella! Bling and my favorite, Decoupage.


For this piece of Decoupage, I changed it up a bit and added more decoupage elements to it choosing to only "uplift" one part of the design.

I fussy cut some random elements out of another piece of J'adore paper and added some bling around my photos to help highlight...

Products used:
Bella! J'adore 12x12 Cardstock - Love
Bella! J'adore 12x12 Cardstock - Love Birds 
Bella! J'adore 12x12 Cardstock - Love Letter 
Cook 12x12 Cardstock - Diecut Cardstock (Glitter) 
Bling Floral Strip Pink
Bling Floral Strip Blue 
FD94- A4 Decoupage Pack 
FD87- A4 Decoupage Pack 
FD00- A4 Decoupage Pack
I hope this layout is a nice reminder to you what Spring is all about! Thanks for stopping by... Carrie

Thursday, March 7, 2013

I am ready for Spring....

Thanks for stopping by...if you came from the Ruby Rock-It Carnival Blog Hop...click here 
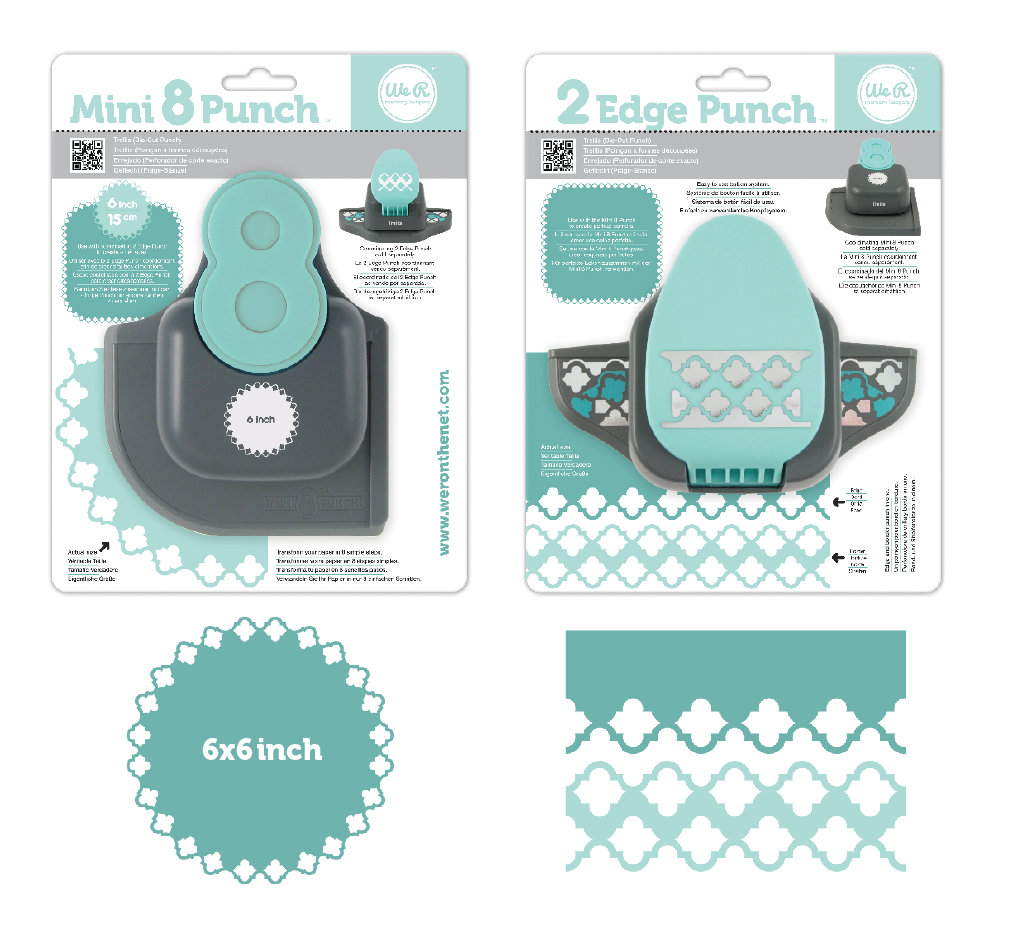
Here in Chicago we really can't complain. Our winter was a relatively mild one...only about 1-2 inches of snow all the way through February. Now that spring should be making an appearance soon it has finally started to make up for all of that lack of snow. We had a mild 'storm' last week dropping about 3-4 inches and now on Monday we got hit with about 8-10 inches. Not liking winter making such a late entry...I am ready for spring. So, to get me in the mood I thought I would share with you a spring bouquet I made (maybe some of you saw this recently on HSN for the WRMK debut of the Mini 8/ 2 Edge Border punch). I cut strips in all the different Simply Spring papers and then used the border punch to make accordion flowers. Added some fabric brads for the center and decorated an empty canister using more papers and die cuts from the same line and ended up with a beautiful spring bouquet centerpiece.

For my layout I used the Simply Spring collection again and showed the different ways these punches can be used. I made a border background using the outside punch, and I used both punches to create a little doily. The little squares are the scraps from using my Mini 8 punch (I save the scraps when I use it, you never know when they will come in handy)

I hope this help put a little spring to your day...thanks for stopping by!

Tuesday, March 5, 2013

Come one Come all to the Ruby Rock-It Carnival Blog Hop!

Hello Ruby Rock-it Fans! Today, we are celebrating our beautiful New Carnival KING and QUEEN ranges that are debuted at CHA Winter, and are shipping as we speak! Come and hop along with us, leaving comments at each blog to enter to win an awesome Ruby Rock-it prize pack! You could win your very own CARNIVAL KING range!
Here's the order of blogs in case you get lost along the way!
 RRBF BLOG
 Beckie Dreyer 
 June Goh
 Liana Suwandi
 Erin Yamabe
 Lisa Novogrodski
 Carrie Walz---YOU ARE HERE
 Lisa Webb---NEXT STOP!
 Becky Olsen
 Pattie Beltran
 Kris Berc
 RRBF BLOG 
Remember you must leave a comment on all the blogs along the way so that you could win...


Products used:
 - Carnival King 6pcs - Garlands
 - Carnival King Die Cuts 24pcs
  - Carnival King 3D Sticker Pack 14pcs
 - Carnival King 12x12 Cardstock - A to Z
 - Carnival King 12x12 Cardstock - Dots
- Carnival King Party Picks 12 pcs

Wednesday, February 27, 2013

I L*O*V*E You!

Hello everyone! Thanks for stopping by. As February is winding down, I thought I would do something a bit different. I decided to scraplift myself, I just loved these photos of my daughter and thought they were just the perfect way to end the month. The first time I did this layout I did it with bold bright colors, this time I thought I would tone it down and use some soft warm pastels. Every thing is done with several different lines from Ruby Rock-It/Bella! Fundamentals...I hope you enjoy it!


Products Used:
FD94- A4 Decoupage Pack
Arcadia Pearl Combo 
Arcadia Cardstock Sticker 
Arcadia 12x12 Cardstock - Serenity
Reminisce 12x12 Cardstock Hourglass 
Fusion 12x12 Cardstock Sandalwood 
Eklectique Mini Paper Pack
FD00- A4 Decoupage Pack 
Sugar Candy 12x12 GlitterCardstock- Almond Jewels

Thursday, February 14, 2013

Happy Valentine's Day....

Happy Valentine's Day everyone! Today I have a couple of cute and quick cards to show you using the We R Memory Keepers Sew Easy Circles.
This tool was so fun and easy and it gave my cards that "special" punch...I hope you enjoy!


Supplies: Crazy for You Collection (paper, cardstock, Embossed Die-Cut Tags)
12x13" Piercing mat
Sew Easy Circles
Sew Easy Head (Stitch)
Sew Ribbon Floss (pink, white, red) Corner Chomper (1/2" Radius)

 1. Trim card bases to desired size.

2. Trim various pieces of patterned paper to layer and adhere to cards as shown.

3. Attach the Sew Easy Head to the Sew Easy Circles tool

4. Slide the Sew Easy Circle guide to the desired size. Using the Sew Easy Piercing Mat, carefully hold the back end of tool and guide it around your paper.

5. Use the Sew Easy Floss and needle to sew through the pierced holes.

6. Adhere Die-Cut tags as shown.

Monday, February 11, 2013

Turn that channel to HSN to see We R Memory Keepers...

You aren't going to want to miss HSN tonight so if you can't watch it make sure to set your DVR's for 10 pm MT time so you will be sure to see the new fun punch We R Memory Keepers will be airing. It is the new We R Mini 8 and 2 Edge Punch. I got to make a few projects with this but I am only going to show you a peek...you are going to have to watch the show!

Monday, February 4, 2013

Washi Tape and Valentines cards....

Wow, it has been awhile since I have posted anything...I think I am finally settled from Christmas, CHA and New Years, although I do have a busy month or two coming up again with my anniversary, Valentines Day, my daughter's birthday, my son's birthday and my nephew's birthday all within a 3 week period. I figured with all of that coming up I would take this down time to share some cards with you. The 3 that I am sharing today were also posted over on the Card Annex blog. I used the We R Memory Keepers Crazy for You line along with We R Memory Keepers Washi Tape. When the Washi Tape came out, I will be honest with you...I didn't really get it, but after playing around with it I find it to be a nice staple. I have 3 different examples of how the Washi Tape can be used. My first card I used it to cover a "naked" diecut. I cut strips using several different patterened tapes, trimmed and inked the edges and my diecut was now quickly altered. It is also nice to use when you have that card or layout that just needs that little something like on my card...I cut a strip and used it for a contrasting border.
For my second card I decided to use it to create a background for my negative space in my frame. I again cut strips, this time making them uneven and at different lengths. I then put my frame over the strips and I created a contrasting background.
For my last card I used a clothes pin and covered it with the Washi Tape, a real quick and easy way to jazz up your card or layout.
Well, I hope this helps you with some more ideas for using Washi Tape and if you have some to share with me...leave me a comment with your idea. I am always happy to learn new ways to use things!